
TwistMyArm
TPF Noob!
- Joined
- May 15, 2003
- Messages
- 2,399
- Reaction score
- 5
- Location
- Brantford, Ontario
- Website
- www.darn.ca
- Can others edit my Photos
- Photos NOT OK to edit
Ones first thought regarding multiple exposures might be that they seem difficult to produce, but trust me this is definitely not the case. Multiple exposures are very easy to create. In fact many of you have probably created some interesting multiple exposure photographs by accident.
Multiple exposures occur when you have more then one exposure on a single frame. Basically you are taking two photos without advancing the film. Multiple exposure photographs (or double exposures), when done well, can often be very interesting and very dramatic.
The first thing you need to know is how to produce a multiple exposure using your camera. Some manual cameras may require you to hold down a button while advancing the shutter. Many automatic cameras may have a built in feature which allows you to simply set the camera to a multiple exposure mode. In order to determine how to produce a multiple exposure photograph with your camera you should review your manual or contact the manufacturer (or you could always ask users in the forum who have similar models).
Once you know how to create a multiple exposure with your camera you’ll realize how easy it is. The hardest part is probably trying to find subject matter that works well. Then again just like any other form of photography you don’t always know what will make a good subject matter until you give it a shot (pardon the pun).
One example of a multi-exposure photo that stuck with me was a photo of a telephone. In the photograph the film was exposed once with the telephone cover on and then again with the cover off. It made an interesting see-through image of a subject that most people wouldn’t think twice about.
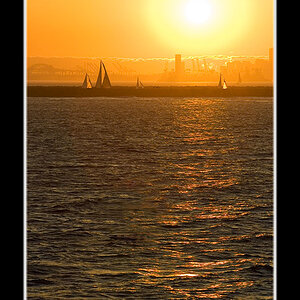
Another more common example of a multiple exposure photo, which many of you have probably seen before, are those cityscape scenes with a giant full moon. As many of you may have found when shooting at night, the moon isn’t always where you want it. In order to add a missing moon to the cityscape the photographer may have decided to perform a multiple exposure. To do this they would have composed the cityscape as they would want it to appear in the photo and then exposed the frame. They would then advance the shutter (without advancing the film) and compose the moon somewhere above where the city was. Once the moon was in place the photographer would fire away with the second exposure. In order to make the moon appear even larger they may have used a telephoto lens to zoom in on the moon.
Despite the fact that when creating multiple exposure images you’re exposing the same frame multiple times you very rarely have to compensate for what your camera tells you as the proper exposure. In fact most often you can fire off the photos using the properly metered values.
However, in some cases you may wish to underexpose the images you are shooting. If the two images are nearly identical with minor changes (such as the telephone image where the general backdrop is the same) you may wish to underexpose the two images. The general rule of thumb when shooting two identical overlapped images to multiply the films ISO speed by the number of exposures. Fore example, when you are shooting two exposures with 100 ISO film you would set your camera to 200 ISO. If you wished to expose a frame four times you would set your ISO setting to 400 (4 exposures x 100).
Now here are a couple examples of multiple exposure photos that I took just the other day. In both photos I was shooting 400 ISO Kodak B&W C41 film.
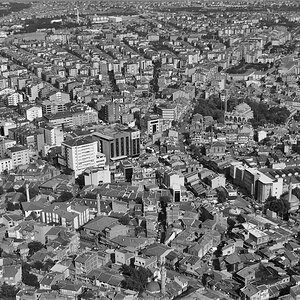
With the first multiple exposure was a complete accident. I was actually taking photos of a car when I accidentally set my Pentax MZ-6 to its multiple exposure mode instead of its auto bracketing mode. I realized what I had done once I made it into the house, where I just snapped off a photo of my wall for kicks. This photo took me by surprise when I saw the ghosted image of people in front of the car. I cropped it incredibly tight (this photo was taken with a landscape orientation http://www.thephotoforum.com/usergallery/albums/album02/resevoircar54.jpg ) to get just the image of Brad Pitt and the guys from the movie Snatch.

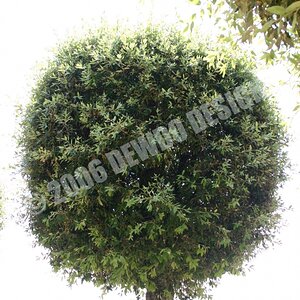
This second photo was created when I set my camera to multiple exposure mode and took a photo of the book while it was closed and then again while it was open. While closed I exposed it for 1/20th of a second at F5.6, which was the properly metered exposure. I opened the book and exposed it a second time, again at 1/20th of a second at F5.6.

Now for all you digital users, whose cameras will not shoot multiple exposures, don’t worry. You can achieve similar effects using various photo editing programs like Adobe PhotoShop.
I’m not going to go into detail on how to achieve the appearance of a multiple exposure photograph using a photo editing program. I will tell you that most serious programs do offer you the ability to blend two images together, which will give you the same result.
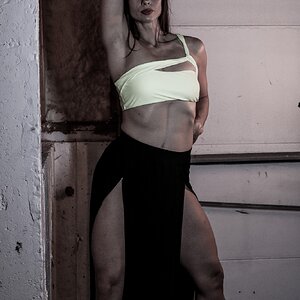
I used PhotoShop to create this image, but did not use the blending feature. I produced this image a different way. I cut out the image of my hand using PhotoShop’s extraction feature. Once the hand was extracted I copied then pasted it as a new layer over top of the original photo. I modified the opacity of the hand and then flattened the entire image.
 ............
If there are any questions or confusion regarding this "how to" please feel free to speak up and I'll try to clarify.
Thanks
Multiple exposures occur when you have more then one exposure on a single frame. Basically you are taking two photos without advancing the film. Multiple exposure photographs (or double exposures), when done well, can often be very interesting and very dramatic.
The first thing you need to know is how to produce a multiple exposure using your camera. Some manual cameras may require you to hold down a button while advancing the shutter. Many automatic cameras may have a built in feature which allows you to simply set the camera to a multiple exposure mode. In order to determine how to produce a multiple exposure photograph with your camera you should review your manual or contact the manufacturer (or you could always ask users in the forum who have similar models).
Once you know how to create a multiple exposure with your camera you’ll realize how easy it is. The hardest part is probably trying to find subject matter that works well. Then again just like any other form of photography you don’t always know what will make a good subject matter until you give it a shot (pardon the pun).
One example of a multi-exposure photo that stuck with me was a photo of a telephone. In the photograph the film was exposed once with the telephone cover on and then again with the cover off. It made an interesting see-through image of a subject that most people wouldn’t think twice about.
Another more common example of a multiple exposure photo, which many of you have probably seen before, are those cityscape scenes with a giant full moon. As many of you may have found when shooting at night, the moon isn’t always where you want it. In order to add a missing moon to the cityscape the photographer may have decided to perform a multiple exposure. To do this they would have composed the cityscape as they would want it to appear in the photo and then exposed the frame. They would then advance the shutter (without advancing the film) and compose the moon somewhere above where the city was. Once the moon was in place the photographer would fire away with the second exposure. In order to make the moon appear even larger they may have used a telephoto lens to zoom in on the moon.
Despite the fact that when creating multiple exposure images you’re exposing the same frame multiple times you very rarely have to compensate for what your camera tells you as the proper exposure. In fact most often you can fire off the photos using the properly metered values.
However, in some cases you may wish to underexpose the images you are shooting. If the two images are nearly identical with minor changes (such as the telephone image where the general backdrop is the same) you may wish to underexpose the two images. The general rule of thumb when shooting two identical overlapped images to multiply the films ISO speed by the number of exposures. Fore example, when you are shooting two exposures with 100 ISO film you would set your camera to 200 ISO. If you wished to expose a frame four times you would set your ISO setting to 400 (4 exposures x 100).
Now here are a couple examples of multiple exposure photos that I took just the other day. In both photos I was shooting 400 ISO Kodak B&W C41 film.
With the first multiple exposure was a complete accident. I was actually taking photos of a car when I accidentally set my Pentax MZ-6 to its multiple exposure mode instead of its auto bracketing mode. I realized what I had done once I made it into the house, where I just snapped off a photo of my wall for kicks. This photo took me by surprise when I saw the ghosted image of people in front of the car. I cropped it incredibly tight (this photo was taken with a landscape orientation http://www.thephotoforum.com/usergallery/albums/album02/resevoircar54.jpg ) to get just the image of Brad Pitt and the guys from the movie Snatch.
This second photo was created when I set my camera to multiple exposure mode and took a photo of the book while it was closed and then again while it was open. While closed I exposed it for 1/20th of a second at F5.6, which was the properly metered exposure. I opened the book and exposed it a second time, again at 1/20th of a second at F5.6.
Now for all you digital users, whose cameras will not shoot multiple exposures, don’t worry. You can achieve similar effects using various photo editing programs like Adobe PhotoShop.
I’m not going to go into detail on how to achieve the appearance of a multiple exposure photograph using a photo editing program. I will tell you that most serious programs do offer you the ability to blend two images together, which will give you the same result.
I used PhotoShop to create this image, but did not use the blending feature. I produced this image a different way. I cut out the image of my hand using PhotoShop’s extraction feature. Once the hand was extracted I copied then pasted it as a new layer over top of the original photo. I modified the opacity of the hand and then flattened the entire image.
If there are any questions or confusion regarding this "how to" please feel free to speak up and I'll try to clarify.
Thanks

![[No title]](/data/xfmg/thumbnail/42/42350-49b17d39599ec1d51c6d801ea651d3af.jpg?1619740148)
